Instructions on setting up your school's teachers and students.
X. Introduction
1. Log in as admin
2. How to Add Classes
3. How to Roster Teachers
4. How to Roster Students
5. How to Assign Licenses to Teachers
6. How Teachers Assign Books to Students
X. Introduction
What is the purpose of a School Admin?
Instead of Lab-Aids assigning licenses to individual teachers and students, this process relies on a School Admin that can roster students, teachers, and other staff, then distribute licenses to teachers. In addition, the School Admin also creates “Classes” within your online portal that associate teachers and students accordingly.
Most schools should already have a designated person to handle such rostering and provisioning demands for online educational services. Often, this is a curriculum specialist or IT person in a school/district. If this role does not already exist, a person needs to be selected who will handle this responsibility. The School Admin should have access to your school's class rosters via your Student Information System (SIS). They should know which teachers, students, and classes need access to which content.
1. Log in as Admin
- Where to log in: https://portals.lab-aids.com or lab-aids.com > Book Login
- Username: Your email address
- Password: You should have received an email with your password when you were initially set up.
- If you don't know your username or password, please let us know ASAP by emailing portals@lab-aids.com.
- We recommend changing your password upon login by clicking on your account in the upper right corner.
2. How to Add Classes
You must add classes before rostering teachers or students. Classes provide a way to associate students and teachers in the system.
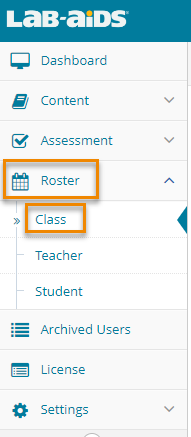
1. Log in using the school admin account. Click on Roster >> Class from the left-hand menu.
2. If you just want to add a few classes, click "Add Class" to add them one-by-one.
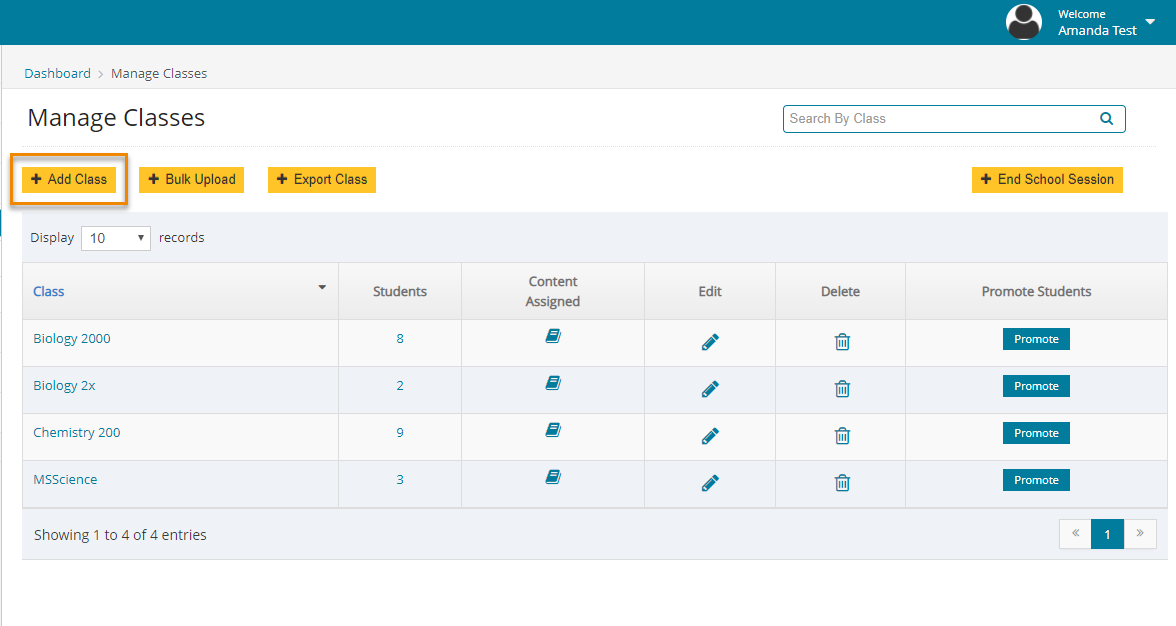
3. If you have many classes to add and want to upload them using the bulk upload template, click on the "Bulk Upload" button and follow the instructions on the screen. See this document for more information on the data required for bulk uploads.
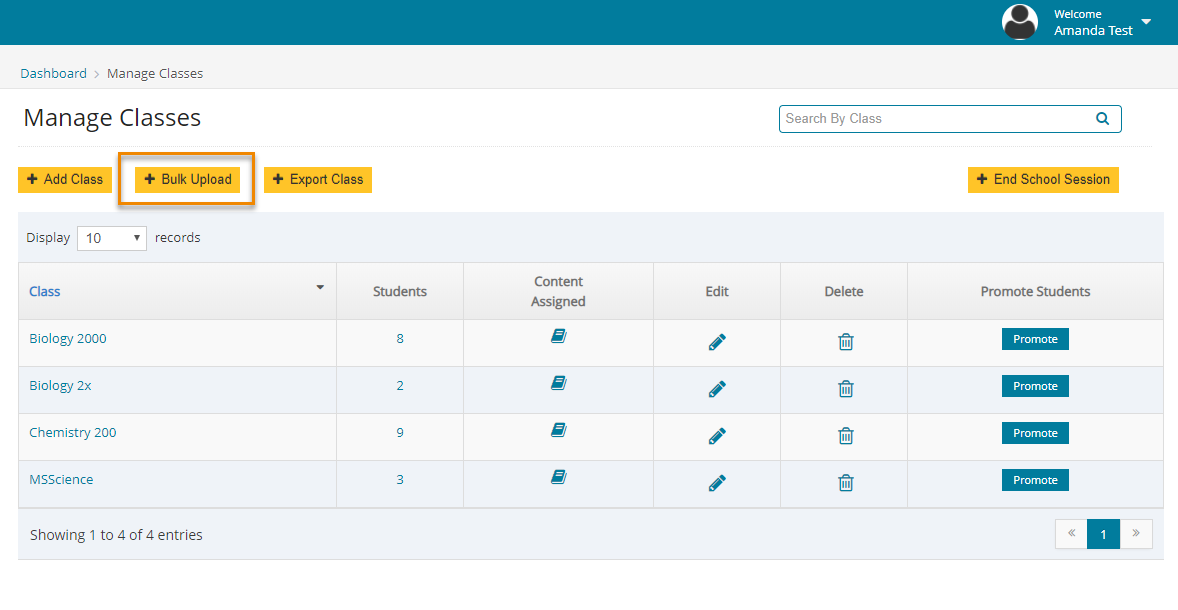
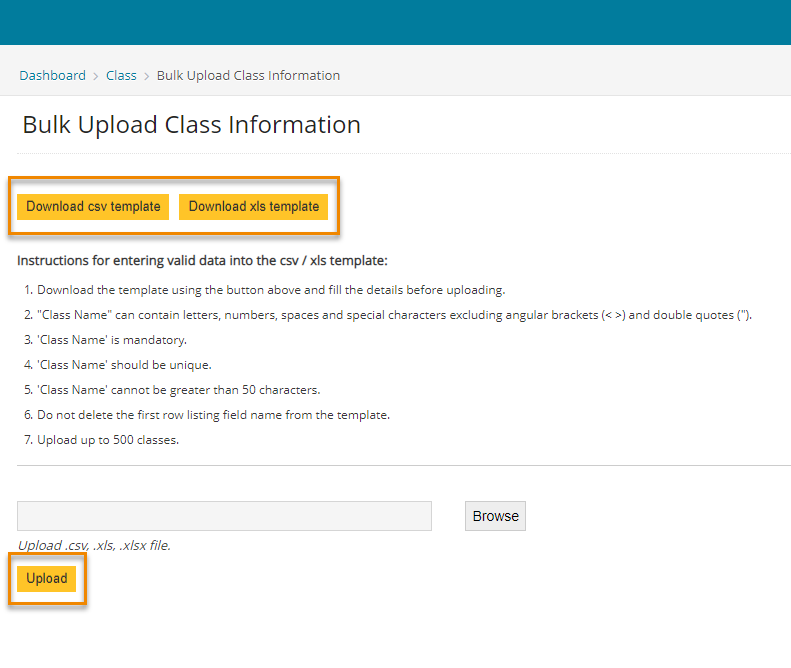
If you choose the Bulk Upload option, you'll need to download the CSV or XLS template of your choice and fill it out according to the instructions on the screen. Then, upload the document on the same "Bulk Upload Class" screen. Be sure to follow the instructions, as they provide important guidelines that will help your upload be successful.
3. How to Roster Teachers
**Important: If you are an admin and you are also a teacher, you'll need to roster yourself as a teacher using a separate email address.**
1. Log in using the school admin account. Click on Roster >> Teacher from the left-hand menu.
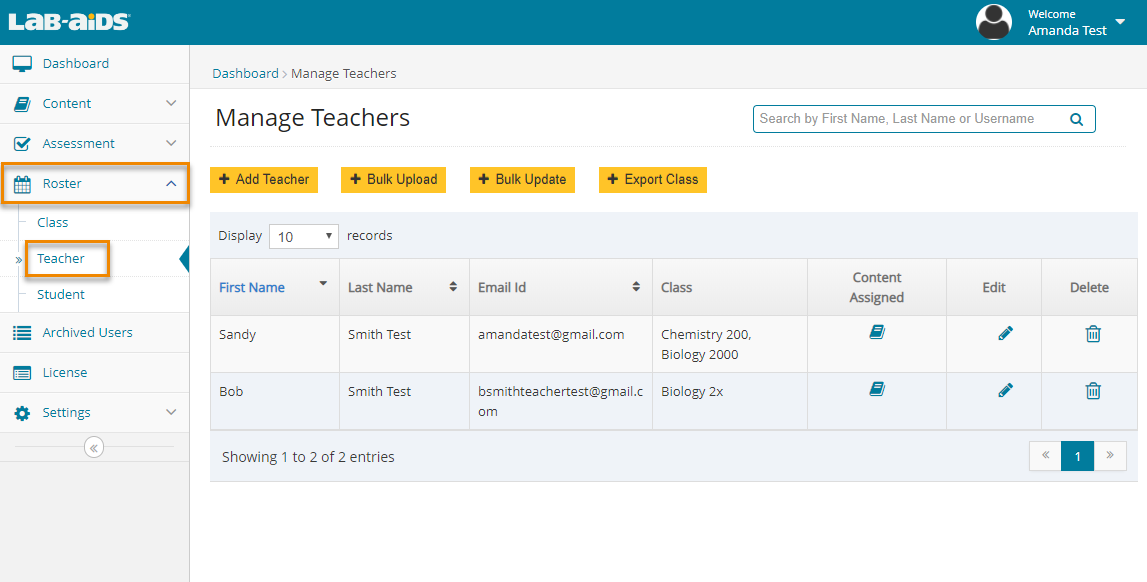
2. Manual Entry: If you just have a few teachers to add, click "Add Teacher" to add teachers manually.
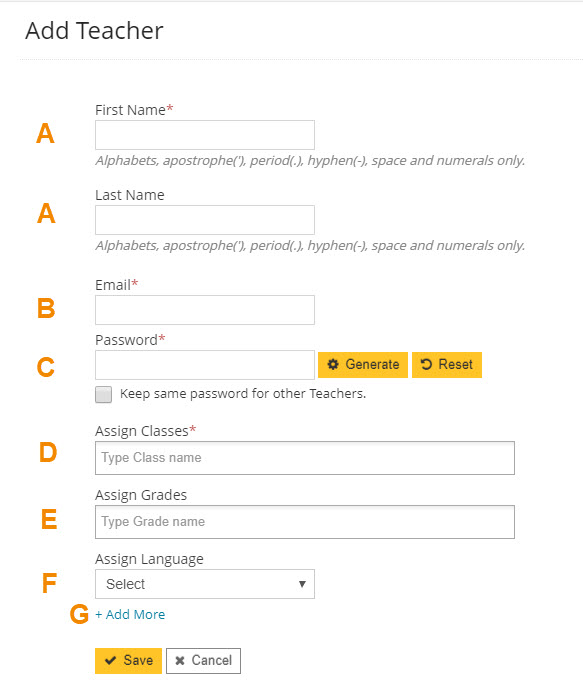
A) Enter first name and last name.
B) Enter email address.
C) Enter the password. You can either type in the password or select "Generate" to auto-generate a password. Select the box "Keep same password for other teachers" if you wish to provide the same password to all the other teachers.
D) Select class names from the list to assign to the teacher. These class names will already exist because you should have already added them in the previous step. Select multiple classes by holding the CTRL button and clicking each class.
E) "Grade" field is optional. We highly recommend leaving "Grade" blank.
F) "Assign Language" is optional. We highly recommend leaving "Assign Language" blank.
G) Click "+Add More" to add another teacher while on the same screen.
3. Bulk Upload: If you have many teachers to add and want to upload them using the bulk upload template, click on the "Bulk Upload" button and follow the instructions on the screen. You can refer to this document for more information on the data required for bulk uploads.
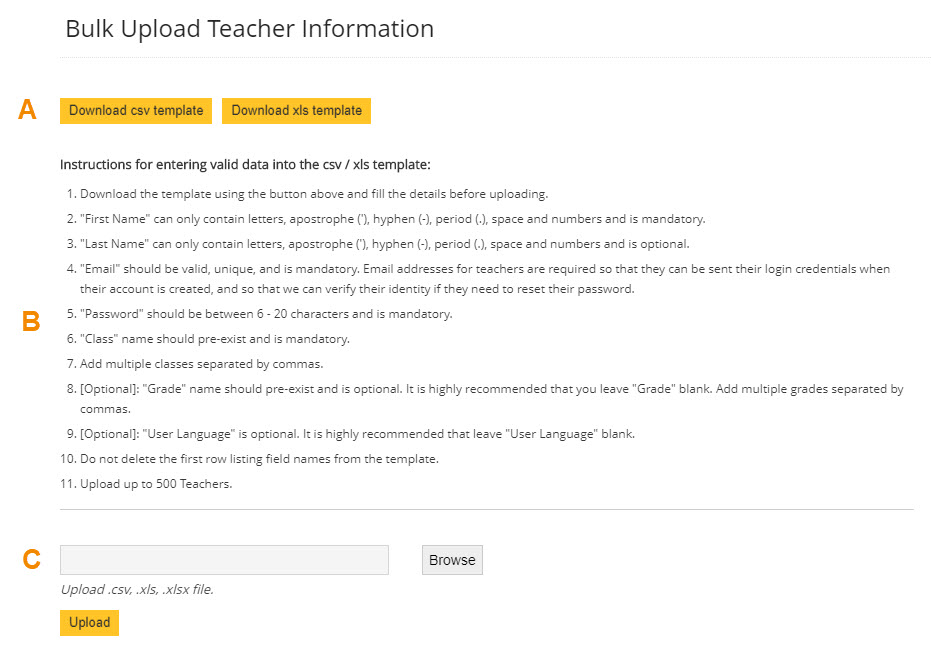
a) Download the CSV or XLS template.
b) Fill out the template with teacher information according to the instructions on the "Bulk Upload" screen. It's very important to follow these instructions, as they will help you have a successful upload. See below for helpful hints.
c) Upload the saved document with bulk teacher information. If you are having trouble uploading documents, please contact portals@lab-aids.com. Include the bulk upload document and the error message you're receiving, and we can help diagnose the issue.
Helpful Hints for Bulk Teacher Upload:
- Read the "Bulk Upload" instructions closely, as they provide important guidelines that will help you have a successful upload.
- Class names must be entered exactly as they are spelled in the system.
- Do not delete any of the column headings on the file. Be sure you have seven column headings in your document.
- "Grade" and "User Language" are optional. We highly recommended leaving these columns blank. Do not remove the column headings.
4. How to Roster Students
1. Log in using the school admin account. Click on Roster >> Student from the left menu.
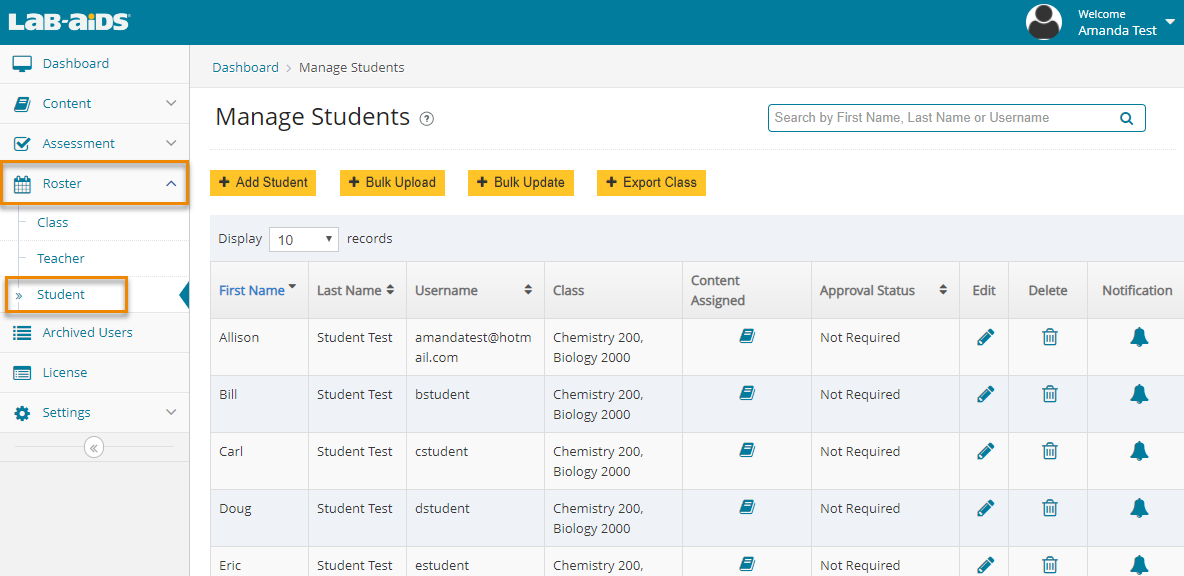
2. Manual Entry: Although you'll likely want to bulk upload your students, you can still add students manually. For manual entry, click "Add Student" and enter the information into each field. For bulk upload, skip to number 3.
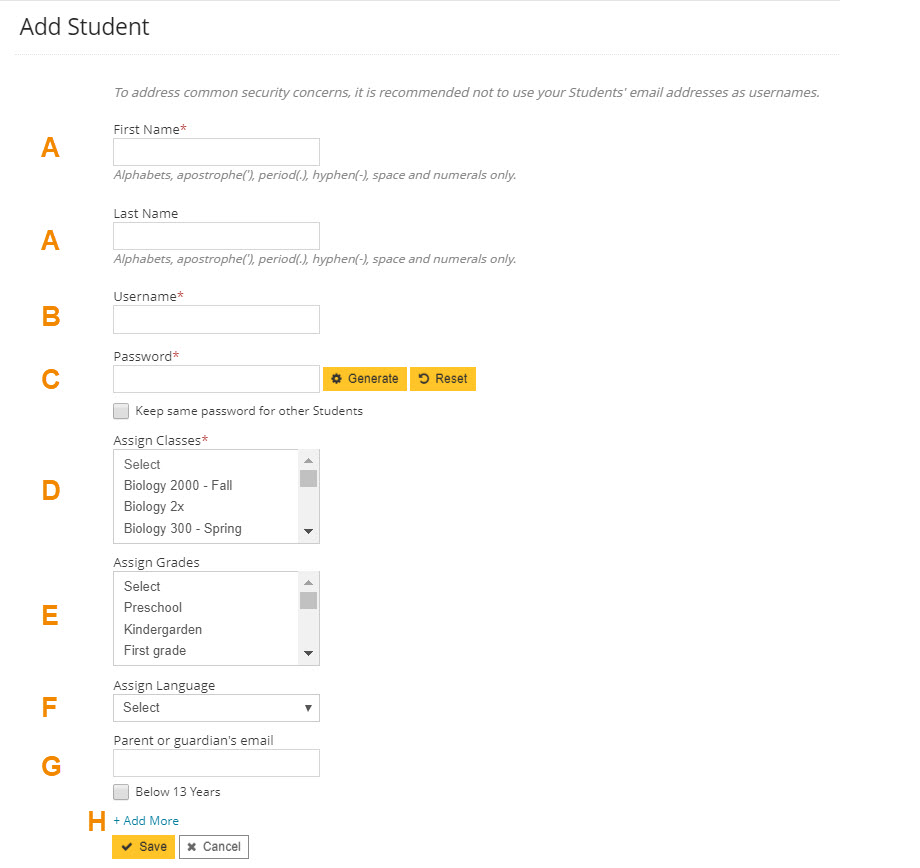
A) Enter first name and last name. Last name is optional.
B) Enter username. Username must be unique. It can be an email address, although it doesn't have to be.
C) Enter password. Password should be between 6-20 characters.
D) Select class names from the list to assign to your student. Select multiple classes by holding the CTRL button and clicking each class.
E) "Grade" is optional. We highly recommend leaving "Grade" blank.
F) "User Language" is optional. We highly recommend leaving "User Language" blank.
G) Parent or guardian email / Below 13 years: These are optional fields. These fields exist to help comply with COPPA. If you choose to enter a parent/guardian email, the system will send an email to the parent/guardian email address that the parent/guardian will need to respond to before the student can use the system. If you have another method of complying with COPPA or if you have students over the age of 13, you can uncheck the box for "Below 13 years" and leave the email field blank. Please refer to this document for more detail.
H) Click "+Add More" to add another student while on the same screen.
3. Bulk Upload: Click on the "Bulk Upload" button and follow the instructions on the screen. After uploading the file, check your email for a confirmation/status email from noreply@lab-aids.com. You can refer to this document for more information on the data required for bulk uploads.
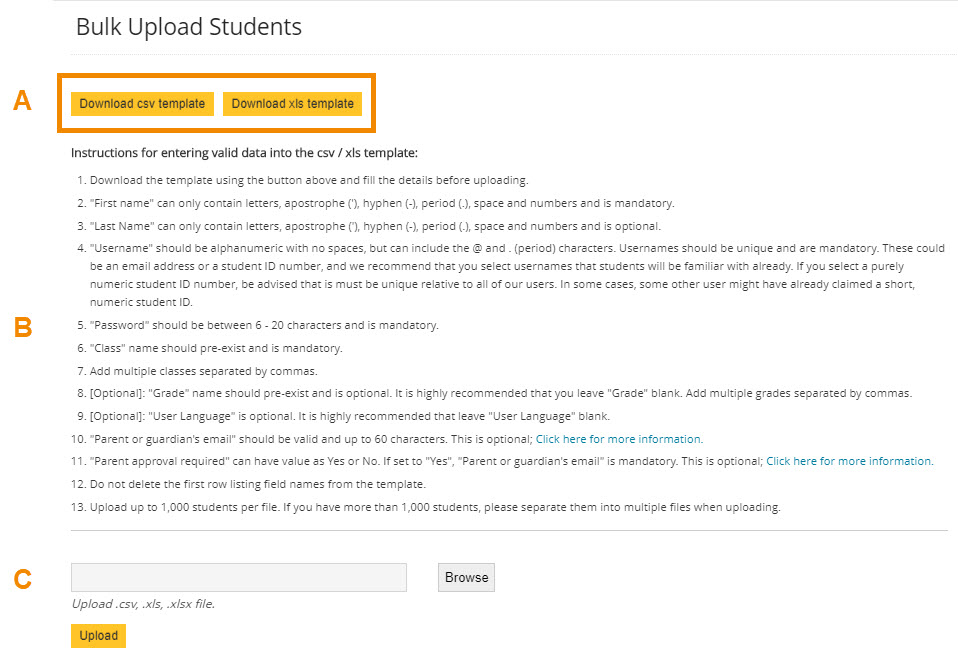
a) Download the CSV or XLS template of your choice.
b) Fill out the template with student information according to the instructions on the screen. It's very important to follow these instructions, as they will help you have a successful upload. See below for helpful hints.
c) Upload the saved document with bulk student information.
d) After upload, check your email for a confirmation email from noreply@lab-aids.com. Errors, if any, will be noted in this email.
If you are having trouble uploading documents, please contact portals@lab-aids.com. Include the bulk upload document and the error message you're receiving, and we can help diagnose the issue.
Helpful Hints for Bulk Uploading Students:
- Read the "Bulk Upload" instructions closely, as they provide important guidelines that will help you have a successful upload.
- Class names must be entered exactly as they are spelled in the system.
- Do not delete any of the column headings on the file. Be sure you have nine column headings in your document.
- "Grade" and "User Language" are optional. We highly recommended leaving these columns blank. Do not remove the column headings.
- If students are over 13 or if you choose not to use our parental approval feature, leave the column for "Parent or guardian's email" blank, and enter "No" under "Parent approval required".
- Username may include @ and . as well as the characters in the instructions.
- After upload, check your email for a confirmation email from noreply@lab-aids.com. Errors, if any, will be noted in this email.
-
If you are having trouble uploading documents, please contact portals@lab-aids.com. Include the bulk upload document and the error message you're receiving, and we can help diagnose the issue.
5. How to Assign Licenses to Teachers
- *Before assigning licenses to teachers, you'll need to make sure you have already added classes and rostered teachers.
- **If you have been given a student transaction/PO and a teacher transaction/PO for the same content, you'll need to assign both to your teachers.
- Note: If you are a District Admin and you are managing the schools under your account, you will need to go back and complete step number 3 on the district admin setup page so that you are assigning licenses to the specific teachers from each school.
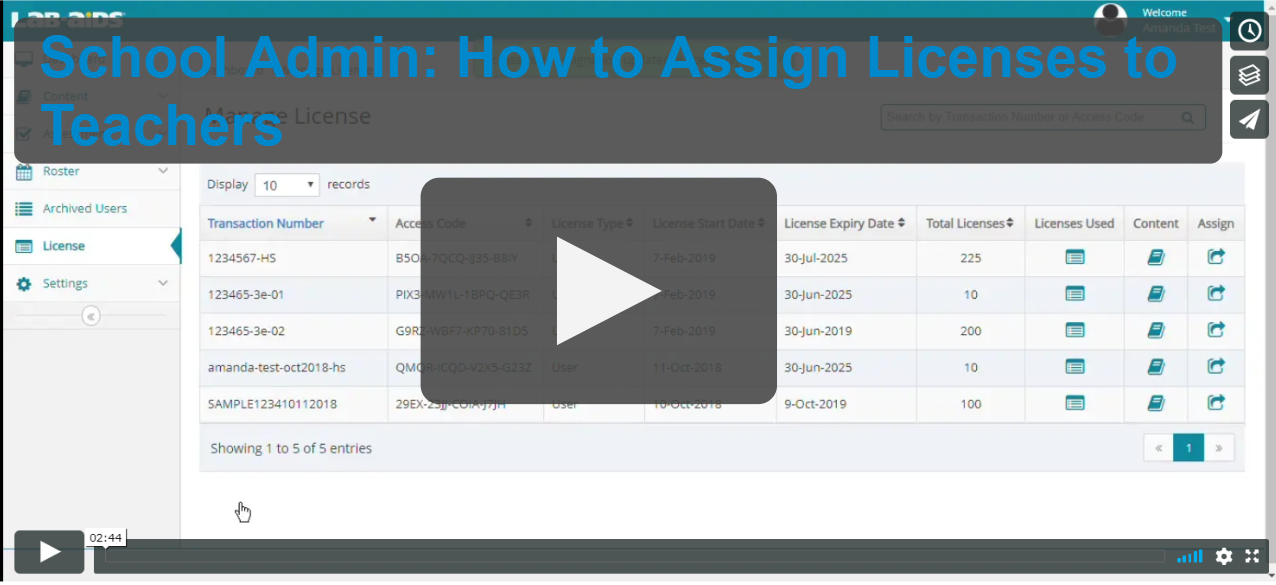
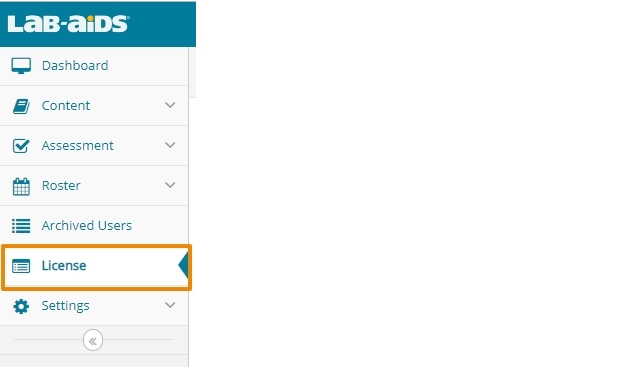
1) After logging into the admin account, select "License" from the left-hand side menu.
- You'll see a list of all POs/transactions (sets of licenses) assigned to your school, along with all related PO/transaction information.
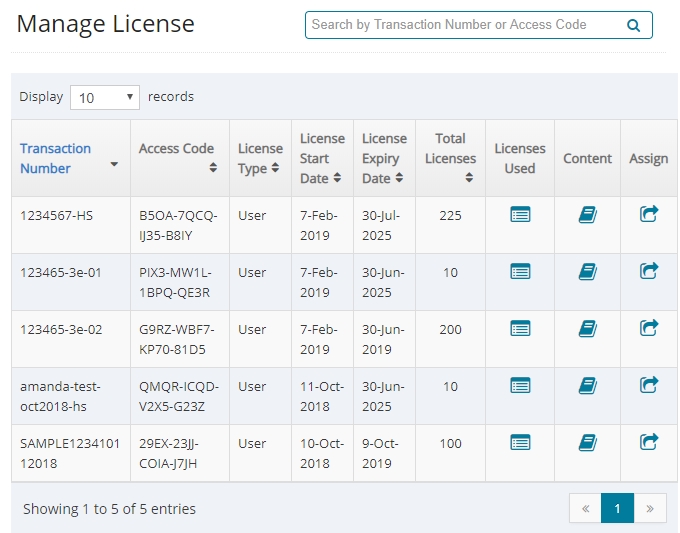
2) Click the "Assign" icon on the right side of the PO/transaction.

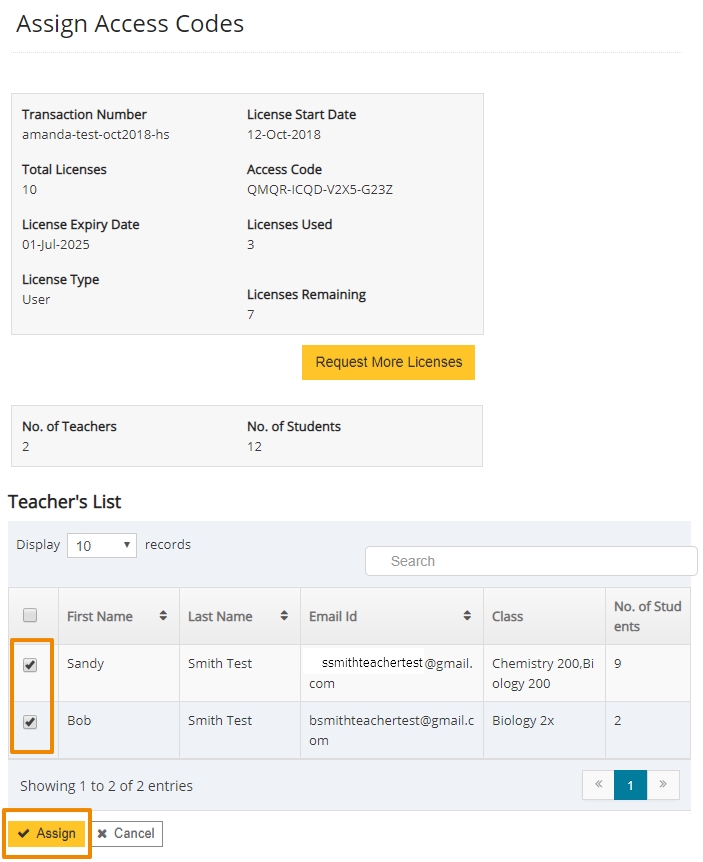
3) Select the teachers who need access to the PO/transaction, and then click "Assign". Your teachers will now have access to this content. Once all necessary POs/transactions have been assigned to teachers, teachers can assign content to their students, if student licenses were purchased* (see Helpful Hint #1 below).
Helpful Hints for Assigning Licenses to Teachers:
*A) If you have been given a student PO/transaction (set of licenses) and a teacher PO/transaction (set of licenses) for the same content, you'll need to assign both POs/transactions to your teachers before they can assign content to their students.
- When the expiration dates of student licenses and teacher licenses differ, we separate out student licenses and teacher licenses into separate POs/transactions. If this is the case, both POs need to be assigned to teachers so that teachers can then assign content to their students.
- The teacher PO usually ends in -01. The student PO usually ends in -02.
- If you only have one PO for both students and teachers, that is okay.
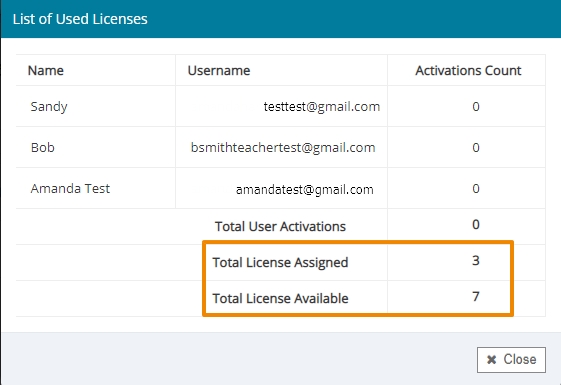
B) How to view licenses used vs. licenses available: From the "Manage License" screen, click on the icon for "Licenses Used" to view Licenses Assigned and Licenses Available. The number in "Total License Assigned" includes any other admins that have access to that PO, in addition to teachers and students.
![]()
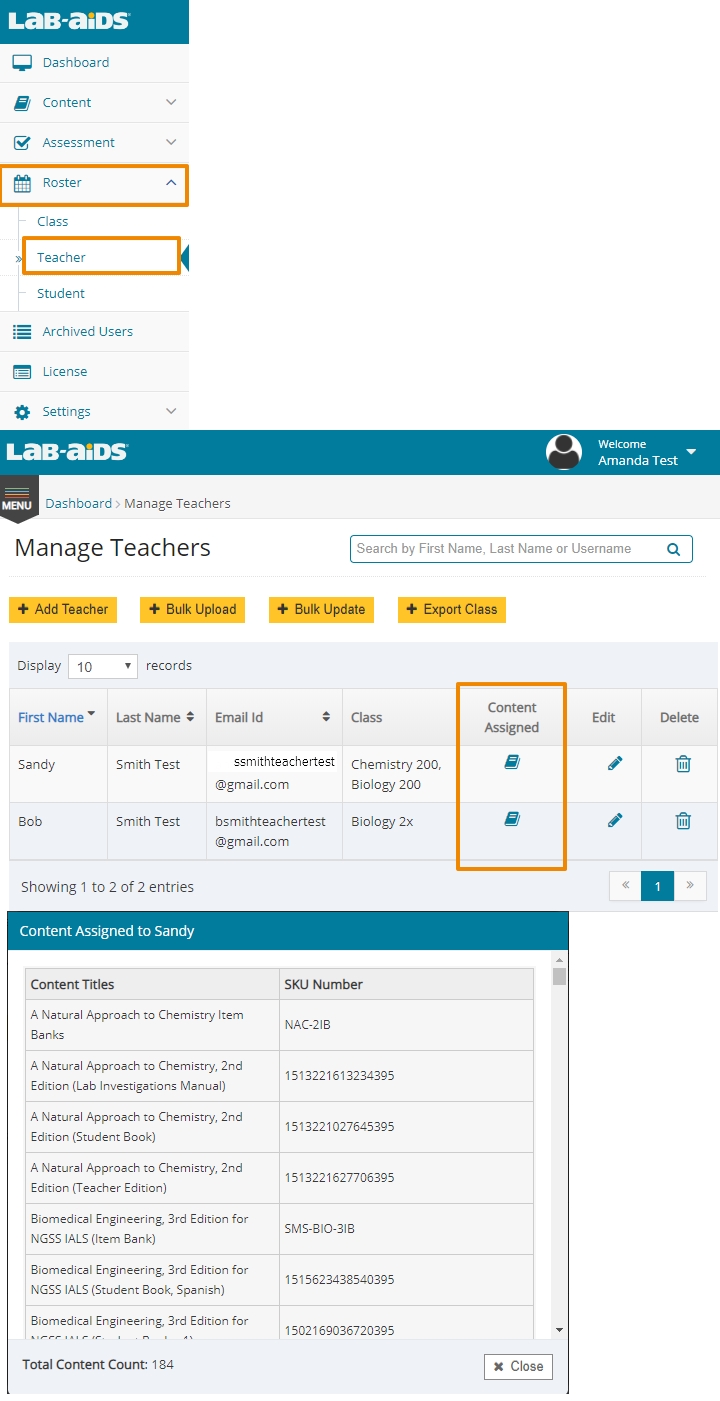
C) You can check to see whether your teachers have been assigned content by going to Roster >> Teacher and click the "Content Assigned" icon.
6. How Teachers Assign Books to Students
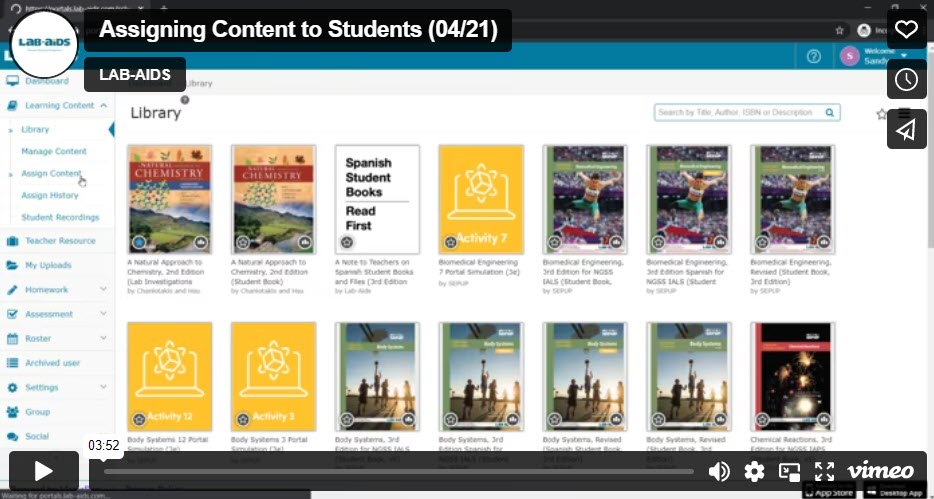
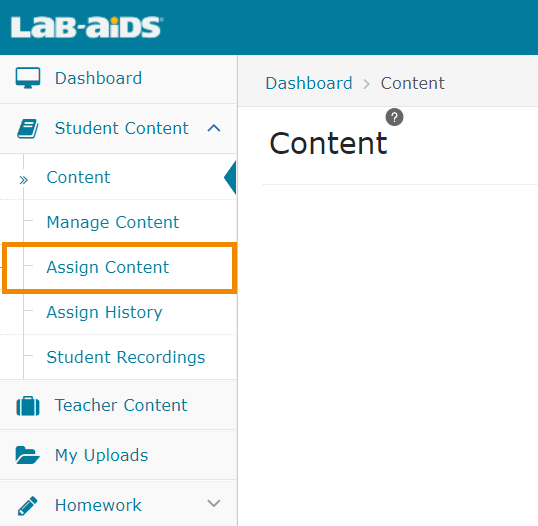
1. After logging into your teacher account, select Student Content >> Assign Content from the left-hand side menu.
2. Next, you will see the available Student Books that you can assign to your students, Classes, or Groups. Select the titles of the Student Books you wish to assign by clicking on the these products.
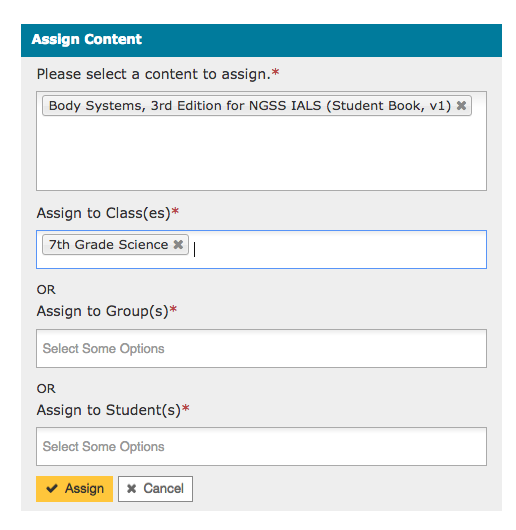
3. You can assign the Student Books you selected to entire Classes, Groups, or your individual students. Once you have selected the appropriate students, click the Assign button, and your students will then have access to these products.
*You'll need to assign content to any new students that join the class after content has already been assigned. New students that get added to your existing classes won't automatically be assigned content.
